Before we continue with setting up the multiple environments that comprise our DTAP, I’d like to take a break and discuss a bit about networks. This way we can understand better what is going on inside and outside of Kubernetes.
Let’s start with the router, the magic box in the living room, whose blinking lights connect us to the world. Here’s a photo of an old one I had in 2015:
This little guy sits between my devices and the internet, as shown in this awesome diagram I drew all by myself:
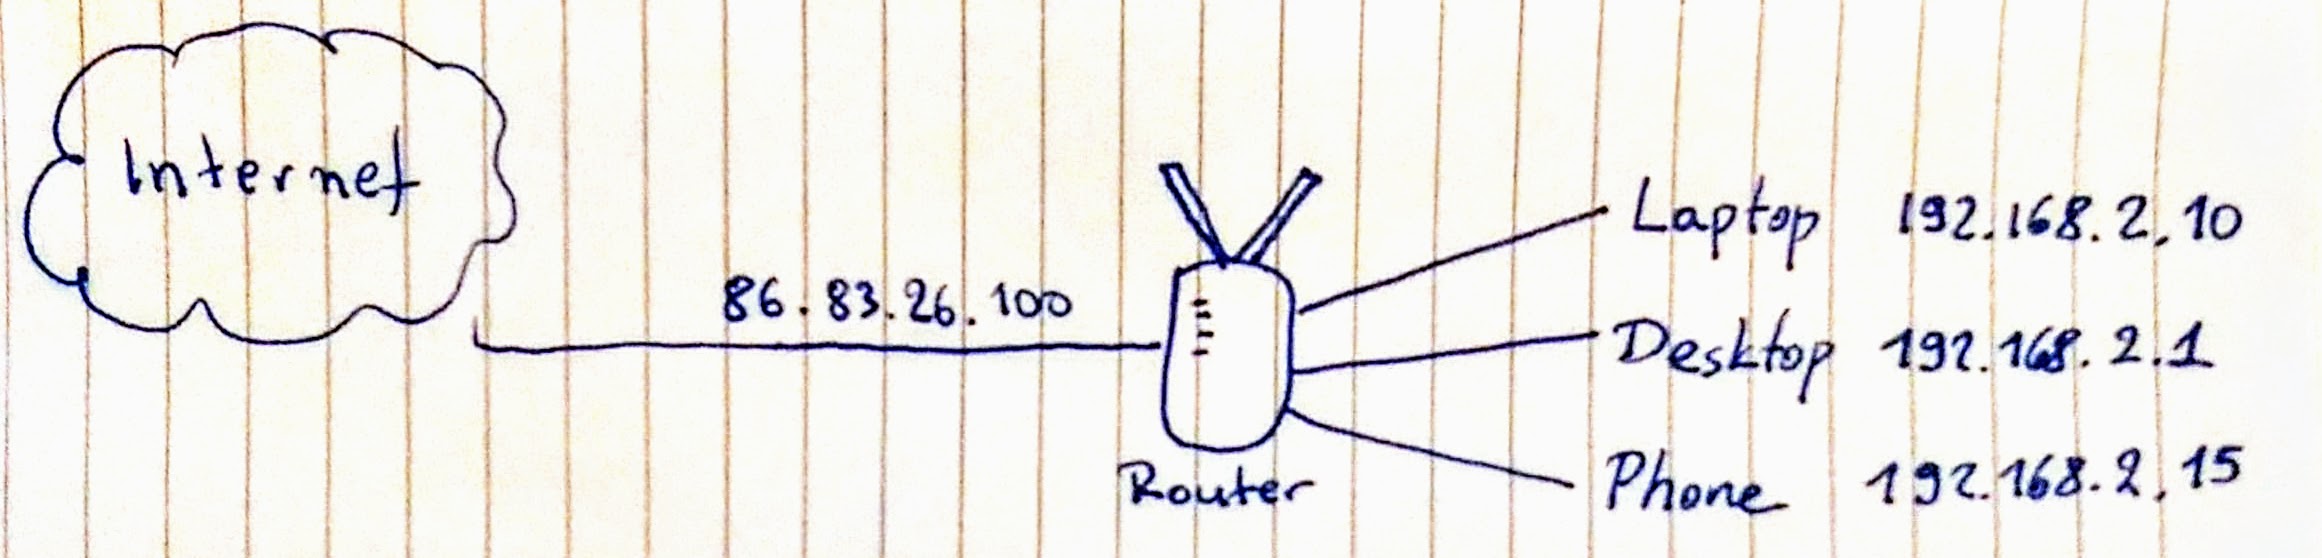
I get an IP address from my internet provider, which I can quickly check by googling “what is my ip address”. That’s the public IP, which hits directly the router. On the inside, we have the local IP addresses. These are not accessible outside this local network. The router automatically assigns an IP address from the range of 192.168.2.1 up to 192.168.2.254 to any one who connects.
These devices that are on the same local network (192.168.2.0/24 if we want to use CIDR notation) can talk to each other without going through the public internet. If my desktop is running a web server, my laptop or phone can browse to http://192.168.2.1/ and see that website. This is not possible when I’m outside the local network (e.g. when my phone is on 4G instead of WiFi).
In this Kubernetes experiment, we are using minikube with VirtualBox. VirtualBox supports all sorts of networking setups for exposing or isolating the virtual machine to/from the outside world. In the default setup, the virtual machine that minikube creates is only accessible to the host device. In my case, that’s my desktop computer:
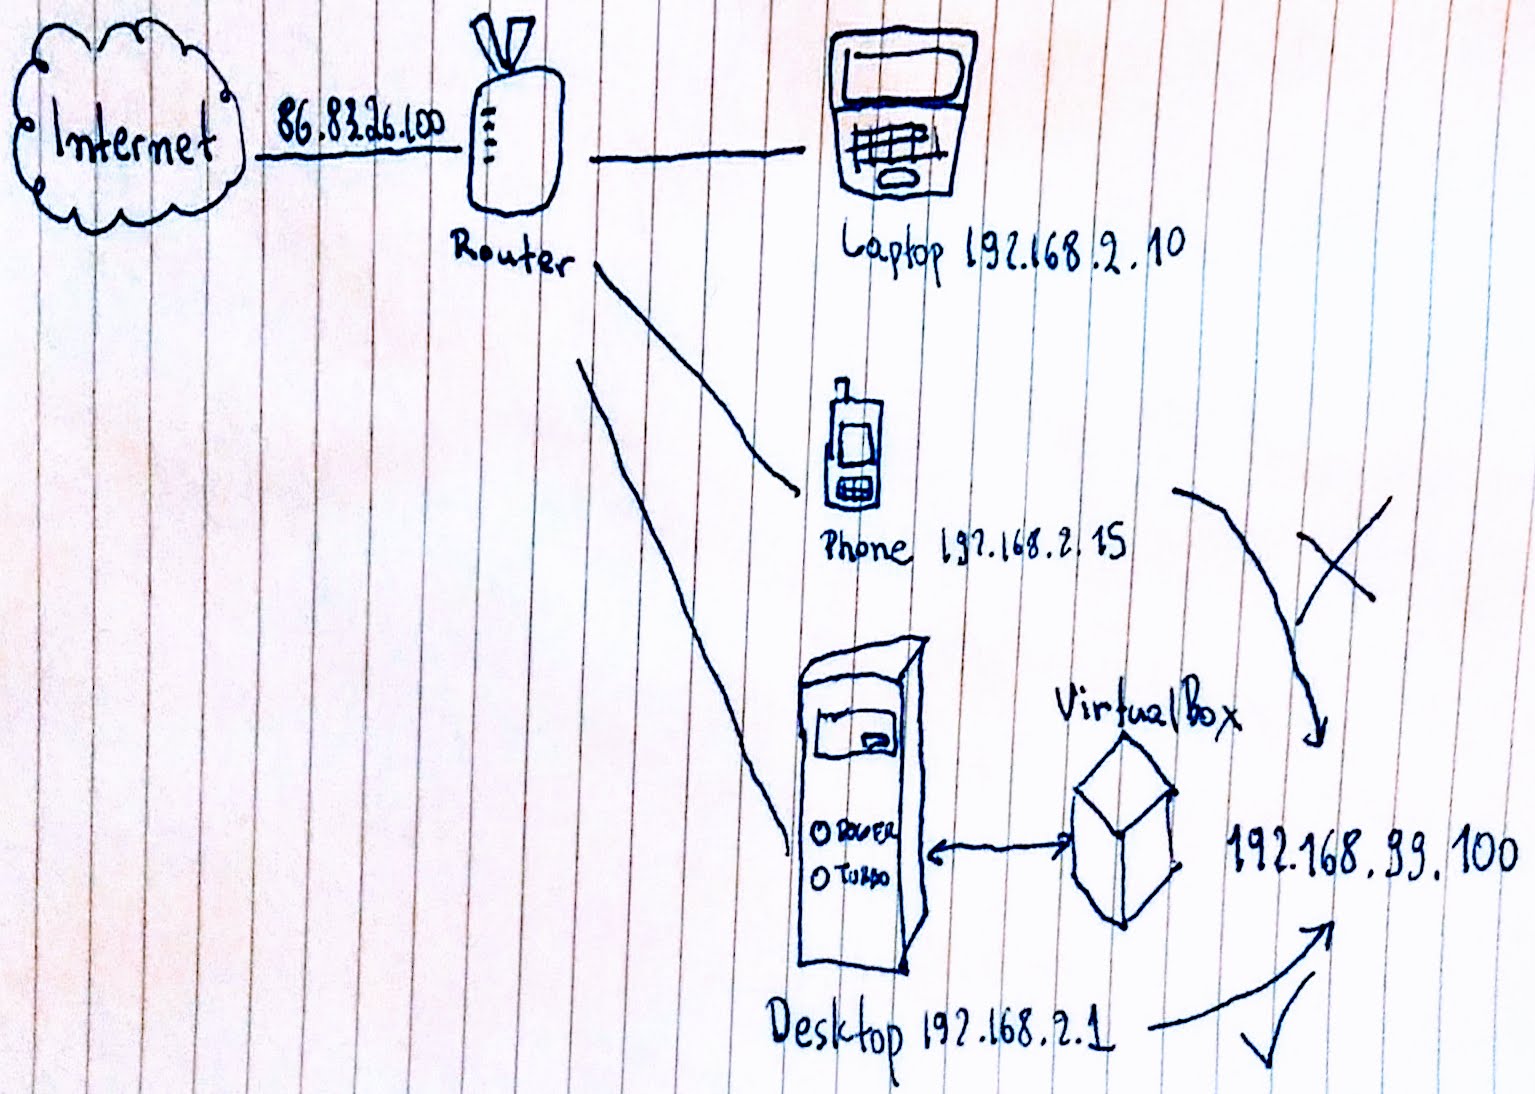
The virtual machine exposes itself to the host on a different network which is only accessible to the host. The IP is usually 192.168.99.100. When I’m working on the desktop computer, I can point my browser to the Kubernetes dashboard on http://192.168.99.100:30000/, but that doesn’t work from my laptop or my phone.
To fix that, we can modify minikube’s virtual machine network settings. First, we need to stop the virtual machine with minikube stop. Then, we create a new network interface in bridged mode with this command:
vboxmanage modifyvm minikube --nic3 bridged --bridgeadapter3 eth0
By default, the virtual machine of minikube has two network devices, so we create a third one. It is also assumed here that the host’s network device is eth0. What does this do? Let’s start again minikube with minikube start and when it’s up and running, ssh into it with minikube ssh. From within that session, run ifconfig to see the network interfaces. There will be quite a lot, but you’ll notice one of them has an IP on the 192.168.2.0/24 network:
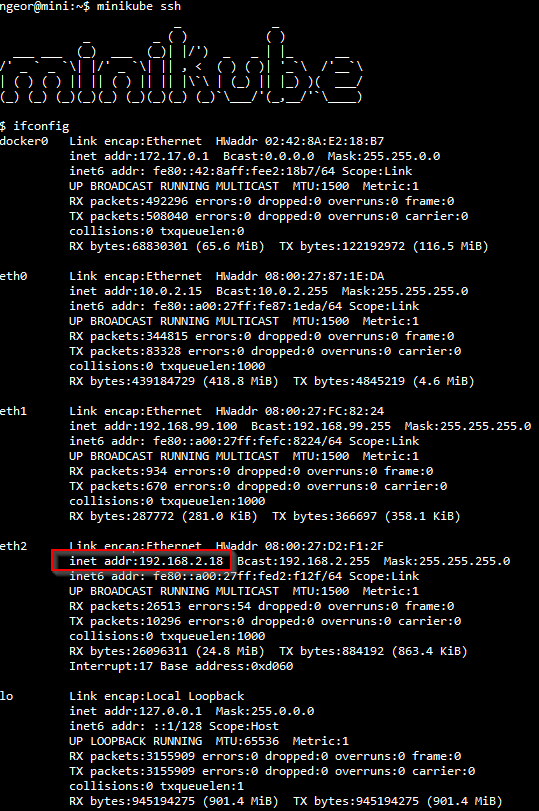
This IP, in my case 192.168.2.18, is accessible from all devices on the local network. This means I can now access the Kubernetes dashboard from my phone on http://192.168.2.18:30000/.
Now we’ve explained a bit what happens with the local network and the virtual machine. Let’s see some points about networking inside Kubernetes itself.
Our application, blog-helm, is running as a Docker container. If we see the pod’s information, there is an IP assigned to it (in my case 172.17.0.3):
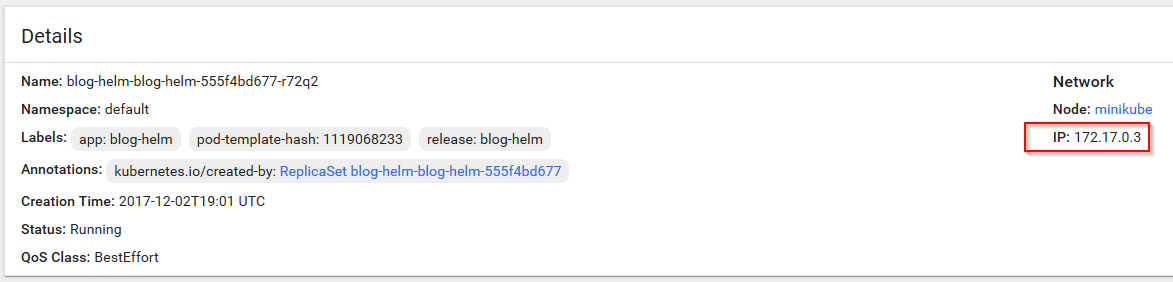
This IP is not accessible to anyone but Kubernetes itself. We can login to minikube with minikube ssh and test it:
ngeor@mini:~$ minikube ssh
                         _             _
            _         _ ( )           ( )
  ___ ___  (_)  ___  (_)| |/')  _   _ | |_      __
/' _ ` _ `\| |/' _ `\| || , <  ( ) ( )| '_`\  /'__`\
| ( ) ( ) || || ( ) || || |\`\ | (_) || |_) )(  ___/
(_) (_) (_)(_)(_) (_)(_)(_) (_)`\___/'(_,__/'`\____)

$ curl http://172.17.0.3:3000/
Hello World!
$ exit
logout
ngeor@mini:~$
The application works fine and listens to port 3000. To make it accessible outside the cluster, we first need a service. The service gets assigned a random IP, which is virtual, and is called cluster IP.
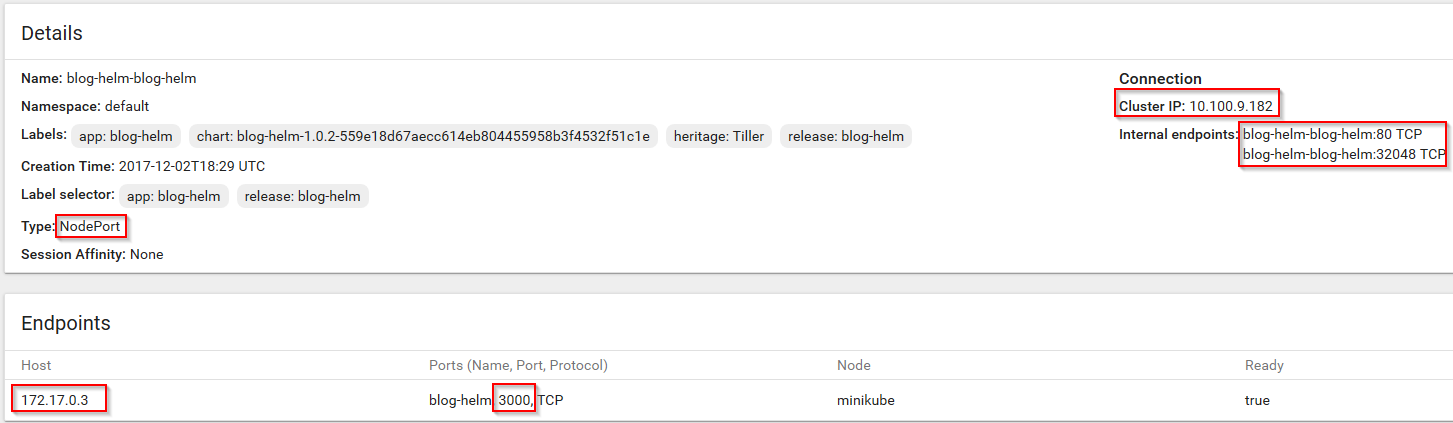
The cluster IP is 10.100.9.182 in this case. Our values.yaml file in the Helm chart had these values for the service:
service:
  name: blog-helm
  type: NodePort
  externalPort: 80
  internalPort: 3000
The internal port is the port our application listens to. The external port is the port that the service will listen to. In this case it’s port 80 (the default port for web). We can try this out just like before from within minikube:
ngeor@mini:~$ minikube ssh
                         _             _
            _         _ ( )           ( )
  ___ ___  (_)  ___  (_)| |/')  _   _ | |_      __
/' _ ` _ `\| |/' _ `\| || , <  ( ) ( )| '_`\  /'__`\
| ( ) ( ) || || ( ) || || |\`\ | (_) || |_) )(  ___/
(_) (_) (_)(_)(_) (_)(_)(_) (_)`\___/'(_,__/'`\____)

$ curl http://10.100.9.182/
Hello World!
$ exit
logout
ngeor@mini:~$
Note that by default the service is still not accessible outside of the cluster! The service is valuable because it allows us to route traffic to multiple pods. To reach the outside world, we have two options: use a NodePort or use Ingress.
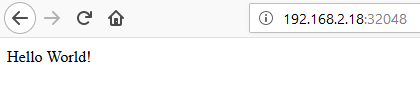
Our Helm chart so far has been using a NodePort. This selects a random port in the range 30000-32767 and makes that available outside the cluster. You can also specify a port if you want to. This is the technique the dashboard is also using by default. Our app has been assigned the port 32048, which is accessible outside the cluster:
The other option we will explore is Ingress. Ingress is another layer on top of the services. While a service allows us to route traffic to multiple pods of the same application, ingress allows us to route traffic to various services based on criteria like the host name or the URL path. It’s like a reverse proxy (in fact one of the implementation of ingress is using nginx).
We’ll need this when setting up our DTAP, because it’s much easier to use URLs like http://test.blog-helm.local/, http://acceptance.blog-helm.local and http://blog-helm.local compared to fiddling around with ports and IPs.
To use ingress, you need to install an ingress controller on the cluster, otherwise it won’t work. For minikube this is easily done by enabling the ingress addon:
minikube addons enable ingress
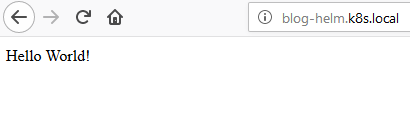
It will take a while until it’s done. To use ingress in our application, we need to modify the ingress bit in values.yaml:
ingress:
  enabled: true
  # Used to create an Ingress record.
  hosts:
    - blog-helm.k8s.local
Of course, this host name needs to point to the cluster’s public IP. Remember that’s 192.168.99.100 which is public only to the host (my desktop computer) or 192.168.2.18 which is public to all my devices. None of these is public to the internet. To do that you have three options: the easiest is to modify the HOSTS file (/etc/hosts or C:\Windows\system32\drivers\etc\hosts) on the computer you want to browse from. I’m not sure you can do this on a phone though, which takes us to the other two options: setup your own DNS server and configure the router to use it so that all connected devices will use it. This is what I’ve done and it wasn’t too hard. The last option is quite easy, providing you have purchased your own domain. Just login to the domain manager tool and assign a few hostnames e.g. blog-helm.my-domain.com to point to the IP.
In the next post, we’ll make things a bit neater by using a Docker registry and we’ll be ready to start setting up our DTAP.