Before we go any further, let’s take a break and add a bit of a structure to our functional tests. This will allow us to reduce the code we have to write for each test. We’ll also start thinking about how to organize the tests into folders and files.
Our current “solution” consists of just one file that contains everything and as you can imagine that doesn’t scale well. That file contains:
- Setup code that allows us to use WebDriverIO
- Tests that focus on different pages. In our example, we have one test for Google and one test for Yahoo. In a real life project, this could be different pages/areas of the same site.
Organizing code into files and folders is something often done ad-hoc, without giving it a lot of thought. You have to add the code somewhere, right? So a developer adds a file somewhere, creates a folder somewhere else, and so on. If there is no guidance and the team is large enough, this can lead to significant pain. Our functional tests are no different.
First, we’ll create a dedicated folder for the functional tests. This way we’ll know that these are separated from the unit tests. Having them in a separate folder makes it easier to isolate and run them during CI. We can just tell mocha to run everything that is inside a specific folder. Keeping them under the same folder with the unit tests would make that more difficult.
While in the end you want of course all tests to pass, running the unit tests first has the advantage of the faster fail feedback. You can run thousands of unit tests in a second, so it makes sense to run the unit tests first and detect any errors with them as soon as possible. Functional tests are typically much slower. This is reflected in the testing pyramid, you can read more in Martin Fowler’s article. My favorite quote from that article by the way is this:
If you get a failure in a high level test, not just do you have a bug in your functional code, you also have a missing unit test.
Back to our folders. Inside the new folder for functional testing, we’ll make two top level sub-folders. One for the tests and one for our framework code. The tests folder will contain tests and probably will get its own internal structure as well as the tests grow in volume. For example, you could have a separate folder for each page of your site (e.g. separate folder for home page, login page, etc) and place tests specific to that page in each folder. The framework folder will contain code that often repeats in tests (like the WebDriverIO setup code we already have in the hooks). In later posts, when we explore the Page Object pattern, we’ll see how that also fits in this framework folder.
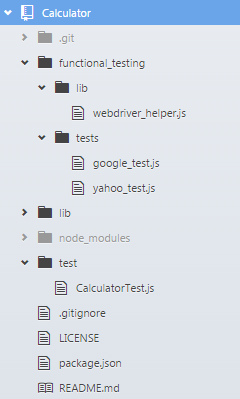
Let’s see how we can implement our first framework file, the webdriver_helper.js. This module will contain the before and after hooks we currently have inlined in the tests and it will expose the browser variable to the tests.
/**
 * Helper class that encapsulates webdriverio
 * and sets up mocha hooks for easier test writing.
 */
function WebDriverHelper() {
    this.browser = null;
}

/**
 * Sets up a before and after mocha hook
 * that initialize and terminate the webdriverio session.
 */
WebDriverHelper.prototype.setupBrowser = function setupBrowser() {
    var _this = this;
    before(function() {
        var webdriverio = require('webdriverio');
        var options = {
            desiredCapabilities: {
                browserName: 'firefox'
            }
        };

        _this.browser = webdriverio
            .remote(options)
            .init();
        return _this.browser;
    });

    after(function() {
        return _this.browser.end();
    });
};

module.exports = new WebDriverHelper();
The test now can focus on what it’s supposed to be doing. Additionally, let’s split the Google and Yahoo tests into separate files. They are more or less similar so far so let’s just see google_test.js:
var expect = require('chai').expect;
var WebDriverHelper = require('../lib/webdriver_helper');

describe('Google', function() {
    WebDriverHelper.setupBrowser();

    it('should verify the title of Google', function() {
        return WebDriverHelper.browser.url('http://www.google.com')
            .getTitle().then(function(title) {
                expect(title).to.equal('Google');
            });
    });
});
As you can see, the test has shrunk a lot. The common code required to setup WebDriverIO has moved to the WebDriverHelper, which also holds the browser variable.
Some more comments about structure and consistency: make sure your tests have a common suffix. In these examples, all tests end with _test.js. These conventions are useful when setting up build tasks. I recommend enforcing these conventions during CI. You can use for example grunt-filenames if you’re using grunt as a build tool.
Another tip that will help you diagnose failed tests is to be consistent in naming the outermost describe of your tests. More specifically:
- you should have only one top-level describe scope in each test
- the describe scope should be named the same as the filename
So, if the filename is called google_test.js then the file should have a describe like:
describe('google', function() {
    // tests here
});
When the tests fail, you’ll get back a report that does not necessarily contain the filename (depending on your CI tool). Having the filename in the describe scope is a life saver because you’ll immediately know which file to look at.
To actually enforce that, you’ll have to go and implement something custom. At work, we’ve implemented this as a custom jscs rule, so it becomes just another code style rule that appears in your editor as you type. You just can’t rely on code reviews for these kind of things.