In this post we’ll see how to create a .NET Core solution with two projects with using nothing but the command line. Once that is setup, we’ll do a bit of TDD using Visual Studio Code.
First, let’s check that the .NET Core CLI is installed:
$ dotnet --version
1.0.4
If that is missing, you’ll need to install it first.
If you just want to create a project (csproj file), you can follow these steps:
- create an empty directory named after your project
mkdir MyApp - change into that directory with
cd MyApp - and finally run
dotnet new console
~/Dropbox/Playground/dotnetcore
$ mkdir MyApp

~/Dropbox/Playground/dotnetcore
$ cd MyApp

~/Dropbox/Playground/dotnetcore/MyApp
$ dotnet new console
Content generation time: 57,4 ms
The template "Console Application" created successfully.
This gives us a very simple result, just two files. The
Program.cs which is the code of the hello world application and the
project file, MyApp.csproj. This is the traditional csproj format,
but it has gone through some diet. For example, it no longer mentions explicitly
the source files of the project. This makes adding/removing files easier.
To restore the NuGet packages of a project, we can run dotnet
restore:
$ dotnet restore
Restoring packages for C:\Users\ngeor\Dropbox\Playground\dotnetcore\MyApp\MyApp.csproj...
Generating MSBuild file C:\Users\ngeor\Dropbox\Playground\dotnetcore\MyApp\obj\MyApp.csproj.nuget.g.props.
Generating MSBuild file C:\Users\ngeor\Dropbox\Playground\dotnetcore\MyApp\obj\MyApp.csproj.nuget.g.targets.
Writing lock file to disk. Path: C:\Users\ngeor\Dropbox\Playground\dotnetcore\MyApp\obj\project.assets.json
Restore completed in 677,66 ms for C:\Users\ngeor\Dropbox\Playground\dotnetcore\MyApp\MyApp.csproj.
NuGet Config files used:
C:\Users\ngeor\AppData\Roaming\NuGet\NuGet.Config
Feeds used:
https://api.nuget.org/v3/index.json
To build a project, simply dotnet build:
$ dotnet build
Microsoft (R) Build Engine version 15.1.1012.6693
Copyright (C) Microsoft Corporation. All rights reserved.
MyApp -> C:\Users\ngeor\Dropbox\Playground\dotnetcore\MyApp\bin\Debug\netcoreapp1.1\MyApp.dll
Build succeeded.
0 Warning(s)
0 Error(s)
Time Elapsed 00:00:01.82
And we can also run it with dotnet run:
$ dotnet run
Hello World!
This is all great as a first step, but most likely you’re going to need the traditional solution file (sln file) with multiple projects. For example, let’s say we also want a unit test project. There’s no need to start fiddling around with editing files manually and there’s no need to install Visual Studio either. This is all still possible from the command line of .NET Core.
First, we’ll create the directory structure like this:
- MyApp is the root folder that will contain the solution file
- MyApp/MyApp.CLI is the folder that will contain the console project
- MyApp/MyApp.Tests is the folder that will contain the unit test project
Inside the MyApp folder, we’ll create an empty solution file with dotnet
new sln:
$ dotnet new sln
Content generation time: 24,8464 ms
The template "Solution File" created successfully.
Inside the MyApp/MyApp.CLI folder, we’ll create the hello world CLI project just like before:
$ dotnet new console
Content generation time: 56,8044 ms
The template "Console Application" created successfully.
Inside the MyApp/MyApp.Tests folder, we’ll create a unit test project. .NET Core has templates for MSTest and xUnit, we’ll use the latter:
$ dotnet new xunit
Content generation time: 59,0936 ms
The template "xUnit Test Project" created successfully.
Now we need to include the new projects in the solution file. From the root
MyApp folder, we use the dotnet sln add command:
$ dotnet sln add MyApp.CLI/MyApp.CLI.csproj MyApp.Tests/MyApp.Tests.csproj
Project `MyApp.CLI\MyApp.CLI.csproj` added to the solution.
Project `MyApp.Tests\MyApp.Tests.csproj` added to the solution.
One last bit remains. The unit test project should have a reference to the CLI
project, in order to be able to test it. That’s done with dotnet add
reference (from the MyApp/MyApp.Tests folder):
$ dotnet add reference ../MyApp.CLI/MyApp.CLI.csproj
Reference `..\MyApp.CLI\MyApp.CLI.csproj` added to the project.
It is possible to restore the packages for the entire solution by running
dotnet restore on the top level folder. The same applies for
dotnet build which will build all projects to the solution. For
dotnet run however you’ll need to be in the CLI project’s folder or
pass --project as an argument.
Now that we have a unit test project, we might as well use it. That’s done with
dotnet test:
$ dotnet test
Build started, please wait...
Build completed.

Test run for C:\Users\ngeor\Dropbox\Playground\dotnetcore\MyApp\MyApp.Tests\bin\Debug\netcoreapp1.1\MyApp.Tests.dll(.NETCoreApp,Version=v1.1)
Microsoft (R) Test Execution Command Line Tool Version 15.0.0.0
Copyright (c) Microsoft Corporation. All rights reserved.

Starting test execution, please wait...
[xUnit.net 00:00:00.4280752] Discovering: MyApp.Tests
[xUnit.net 00:00:00.5086923] Discovered: MyApp.Tests
[xUnit.net 00:00:00.5436821] Starting: MyApp.Tests
[xUnit.net 00:00:00.6580792] Finished: MyApp.Tests

Total tests: 1. Passed: 1. Failed: 0. Skipped: 0.
Test Run Successful.
Test execution time: 1,2565 Seconds
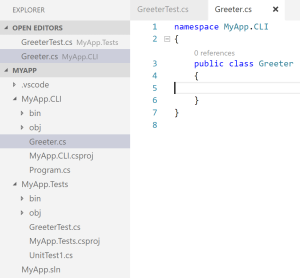
Visual Studio Code has amazing support for .NET Core. Notice the “run test” and “debug test” labels above the unit test method:

These labels are clickable, so you can run the test directly from the editor.
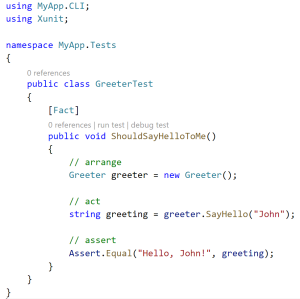
Let’s do a bit of TDD by implementing a Greeter class. The Greeter class will be able to say hello to a person, so it will have a SayHello method.
We’ll start by adding the Greeter test:

since there’s no Greeter class, that’s the first error. Let’s
create the file in the MyApp.CLI project (no need to modify the csproj file!):
Back in the test, the editor is intelligent enough to propose importing the new class, a convenience usually found in full blown IDEs:

The next step is to call the Greeter’s (non-existing)
SayHello method:

The refactoring helper is great here too, it allows us to generate a method that
throws a NotImplementedException (perfect for our TDD approach).
The final bit for our unit test is to write the assertion (and change the class
to public for xUnit to see it, I forgot that bit…):
Clicking the “run test” link leads to a failed test:

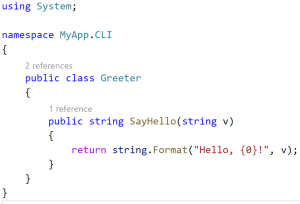
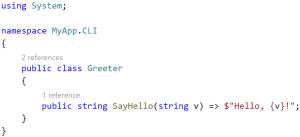
We need to implement the Greeter’s method:
And running the test again passes.
Small side note: when I ask candidates at interviews to describe TDD they always forget the refactor phase. They remember the part of writing a red test and turning it to green, but nobody mentions the refactoring phase. TDD is not red-green, it’s red-green-blue (blue being the refactoring phase).
With that in mind, let’s do some refactoring. Not much to improve here, other than show off some of C#’s more recent features like string interpolation:
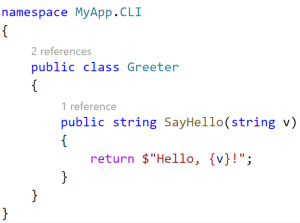
and shorter, expression-bodied methods:
and of course rename the v parameter to a more appropriate name,
like personToGreet (well anything is better than v in
this case).