In this post, I’ll be using Swagger to build a REST API with Java and Spring Boot. Swagger is an API framework. It uses a YAML-based language to define an API and it has a code generator that supports multiple languages.
Tooling
Swagger offers an online editor which is useful to start playing with the language and get familiar with the syntax. But in order to generate some code, it’s handy to have the code generator locally.
On the left side of the editor you can see the YAML syntax. On the right side, a preview of the API, which is updated real-time as you modify the YAML definition:

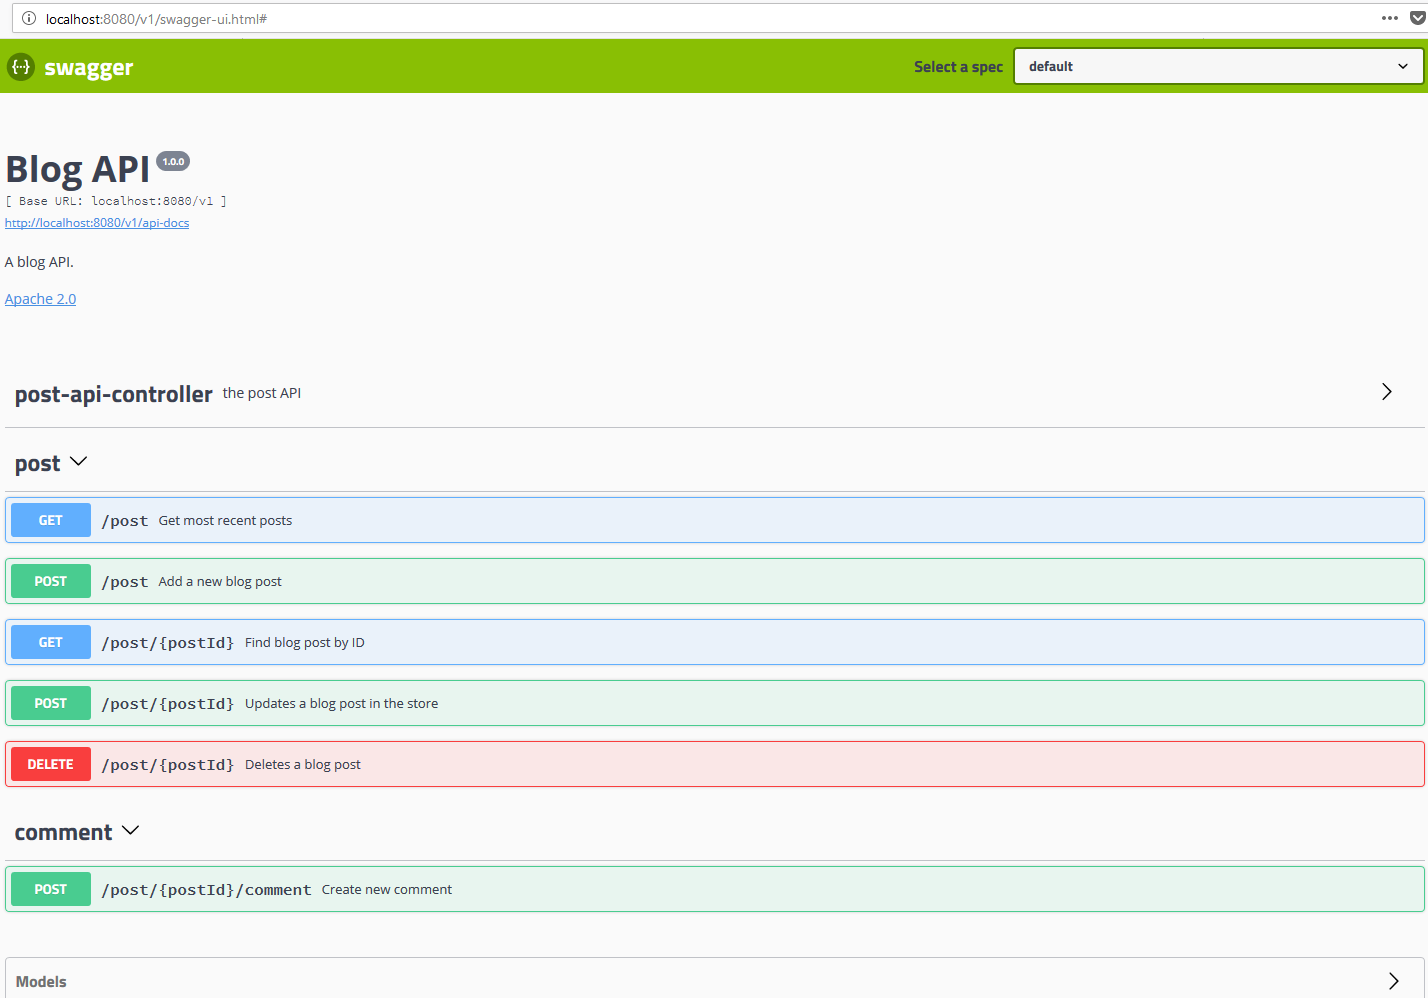
Blog REST API
The example REST API will be an API for blogging.
We’re gonna have the following operations:
- POST on /post will create a new blog post
- GET on /post will get a list of posts
- GET on /post/postId (e.g. /post/42) will get that blog post
- POST on /post/postId will update that blog post
- DELETE on /post/postId will delete that blog post
- POST on /post/{postId}/comment creates a new comment
(I hope it’s not too confusing that one of the models is called Post, which is also an HTTP verb)
YAML file
The entire YAML file looks like this:
swagger: "2.0"
info:
  description: "A blog API."
  version: "1.0.0"
  title: "Blog API"
  license:
    name: "Apache 2.0"
    url: "http://www.apache.org/licenses/LICENSE-2.0.html"

host: "blog.acme.io"
basePath: "/v1"

tags:
- name: "post"
  description: "Managing posts"
- name: "comment"
  description: "Managing comments"

schemes:
- "http"

paths:
  /post:
    get:
      tags:
      - "post"
      summary: "Get most recent posts"
      responses:
        200:
          description: "List of posts"
          schema:
            type: array
            items:
              $ref: '#/definitions/Post'
    post:
      tags:
      - "post"
      summary: "Add a new blog post"
      parameters:
      - in: "body"
        name: "body"
        description: "Blog post information"
        required: true
        schema:
          $ref: "#/definitions/Post"
      responses:
        405:
          description: "Invalid input"
  /post/{postId}:
    get:
      tags:
      - "post"
      summary: "Find blog post by ID"
      description: "Returns a single blog post"
      parameters:
      - name: "postId"
        in: "path"
        description: "ID of post to return"
        required: true
        type: "integer"
        format: "int64"
      responses:
        200:
          description: "successful operation"
          schema:
            $ref: "#/definitions/Post"
        400:
          description: "Invalid ID supplied"
        404:
          description: "Pet not found"
    post:
      tags:
      - "post"
      summary: "Updates a blog post in the store"
      parameters:
      - name: "postId"
        in: "path"
        description: "ID of pet that needs to be updated"
        required: true
        type: "integer"
        format: "int64"
      - in: "body"
        name: "body"
        description: "Blog post information"
        required: true
        schema:
          $ref: "#/definitions/Post"
      responses:
        405:
          description: "Invalid input"
    delete:
      tags:
      - "post"
      summary: "Deletes a blog post"
      parameters:
      - name: "postId"
        in: "path"
        description: "ID of blog post to delete"
        required: true
        type: "integer"
        format: "int64"
      responses:
        400:
          description: "Invalid ID supplied"
        404:
          description: "Blog post not found"
  /post/{postId}/comment:
    post:
      summary: "Create new comment"
      tags:
      - "comment"
      responses:
        404:
          description: "Post not found"
    parameters:
    - name: "postId"
      in: "path"
      required: true
      type: "integer"
      format: "int64"

definitions:
  Post:
    type: "object"
    properties:
      id:
        type: "integer"
        format: "int64"
      title:
        type: "string"
      body:
        type: "string"
              type: "string"
      createdAt:
        type: "string"
        format: "date-time"
      comments:
        type: "array"
        items:
          $ref: "#/definitions/Comment"
  Comment:
    type: "object"
    properties:
      id:
        type: "integer"
        format: "int64"
      body:
        type: "string"
              type: "string"
      createdAt:
        type: "string"
        format: "date-time"
It takes a while to get familiar with it, so let’s highlight some interesting stuff.
- base path (
basePath: "/v1"). That means that the entire API is under the "/v1" path. This can be useful if you want to do a major upgrade in your API in a backwards incompatible way. - tags are used to logically group related operations together. It only affects the documentation of the API and how it's presented to the user.
- paths is the place where you define your operations. For example, see the operation that creates a new blog post:
paths:
  /post: # the path is /post
    post: # the HTTP verb is POST
      tags:
      - "post"
      summary: "Add a new blog post"
      parameters:
      - in: "body"
        name: "body"
        description: "Blog post information"
        required: true
        schema:
          $ref: "#/definitions/Post"
      responses:
        405:
          description: "Invalid input"
- definitions is where you define your models. For example, this is how the blog post model is defined:
definitions:
  Post:
    type: "object"
    properties:
      id:
        type: "integer"
        format: "int64"
      title:
        type: "string"
      body:
        type: "string"
      createdAt:
        type: "string"
        format: "date-time"
      comments:
        type: "array"
        items:
          $ref: "#/definitions/Comment"
The best way to get familiar with this is to read the documentation and play with it.
Generating code
You can see the latest version of swagger-codegen on the releases page on GitHub, which is 2.3.1 at this time. The jar is not published on GitHub. Here’s a direct link to version 2.3.1. You can find all versions here. Download that jar and put it in a folder (in my case it lives in C:\opt\swagger).
If you run the code generator without any arguments, you get the list of languages it supports:
PS> java -jar C:\opt\swagger\swagger-codegen-cli-2.3.1.jar
Available languages: [ada, ada-server, akka-scala, android, apache2, apex, aspnetcore, bash, csharp, clojure, cwiki, cpprest, csharp-dotnet2, dart, elixir, elm, eiffel, erlang-client, erlang-server, finch, flash, python-flask, go, go-server, groovy, haskell-http-client, haskell, jmeter, jaxrs-cxf-client, jaxrs-cxf, java, inflector, jaxrs-cxf-cdi, jaxrs-spec, jaxrs, msf4j, java-pkmst, java-play-framework, jaxrs-resteasy-eap, jaxrs-resteasy, javascript, javascript-closure-angular, java-vertx, kotlin, lua, lumen, nancyfx, nodejs-server, objc, perl, php, powershell, pistache-server, python, qt5cpp, r, rails5, restbed, ruby, rust, rust-server, scala, scala-lagom-server, scalatra, scalaz, php-silex, sinatra, slim, spring, dynamic-html, html2, html, swagger, swagger-yaml, swift4, swift3, swift, php-symfony, tizen, typescript-aurelia, typescript-angular, typescript-angularjs, typescript-fetch, typescript-jquery, typescript-node, undertow, ze-ph]
The language we’ll be using is spring.
To see information about how to generate the code, you need to pass help generate as arguments. To see information about a specific language, you need to pass config-help -l e.g. config-help -l spring.
Let’s create an empty folder and save the YAML file in there as swagger.yaml. At a very minimum, you need to specify the language (in our case that is spring) and the YAML file:
PS> java -jar C:\opt\swagger\swagger-codegen-cli-2.3.1.jar generate -l spring -i .\swagger.yaml
This will generate a maven project in the same location (i.e. pom.xml and swagger.yaml will be on the same folder).
By default, the generated code is using Java 7 and a third party library for dates (threetenbp). To use Java 8 and the built-in java.time API, we need to pass an extra flag:
PS> java -jar C:\opt\swagger\swagger-codegen-cli-2.3.1.jar generate -l spring -i .\swagger.yaml --additional-properties dateLibrary=java8
Some obvious things that you’d want to override are the default group and artifact IDs, as well as the packages of the generated source code:
PS> java -jar C:\opt\swagger\swagger-codegen-cli-2.3.1.jar generate -l spring -i .\swagger.yaml --additional-properties dateLibrary=java8,groupId=com.acme,artifactId=blog,basePackage=com.acme.blog,configPackage=com.acme.blog.configuration,apiPackage=com.acme.blog.api,modelPackage=com.acme.blog.model
In any case, at this point you’ve got a ready to run server. Build the package with mvn package and run it with java -jar target/blog-1.0.0.jar. You’ll be able to access the server at http://localhost:8080/v1.
Before going any further, I’ll upgrade the pom dependencies to use Spring Boot 2 (from 1.5.9 to 2.0.1) and the latest SpringFox (which changes the appearance of the UI a bit, from 2.7.0 to 2.8.0).
This requires a change in application.properties (part of breaking changes between Spring Boot 1 and Spring Boot 2):
# old style, Spring Boot 1.5.x
server.contextPath=/v1

# new style, Spring Boot 2
server.servlet.contextPath=/v1
Every time you run the code generation tool, it will overwrite the code it had generated previously. Luckily, it offers a way of leaving certain files intact. That’s that .swagger-codegen-ignore file, which works just like a .gitignore file. For now, I add the pom.xml and application.properties there:
pom.xml
src/**/application.properties
Advantages
What I like about using swagger is that you get a lot of boilerplate code generated automatically, while it is still just regular Java/Spring code (with some extra Swagger annotations which only affect documentation). This gives you for free a UI which documents your API and offers a playground for people to experiment with it.